Found a nice command-line tool for hacking around with pdf's: pdftk (pdf toolkit).
Installation in ubuntu is typically easy: sudo apt-get install pdftk
I couldn't find a lot of documentation, although there is a book by the author of pdftk (the book doesn't exclusively cover pdftk).
I only wanted to split a multi-page pdf into multiple separate pages, so one of the examples on that site did it for me...
pdftk A=mypdf.pdf cat A1 output page1.pdf
pdftk A=mypdf.pdf cat A2 output page2.pdf
... etc
My Blog has moved to Github Pages
Tuesday, 14 December 2010
Monday, 13 December 2010
Oooh, a pdf-newspaper of my blog...
For my earlier post on turning pdf's of news-papers into images with small file-size I wanted a cheap way to mock up a news-paper, avoiding any potential copyright issues. Came across a pretty impressive site that does a really nice job of it - fivefilters.org. You just feed it a url and it pdf'izes it.
You have to explicitly tell it to keep images, otherwise you'll get a text-only pdf, as I found the first time I tried it. This is the url to create a pdf of my blog (note "images=true")
http://fivefilters.org/pdf-newspaper/makepdf.php?images=true&feed=http%3A%2F%2Fsteveliles.blogspot.com%2F
And here's a sample of the result (click to download the full pdf ~1.3Mb):
 I'm impressed, fivefilters, nice job!
You have to explicitly tell it to keep images, otherwise you'll get a text-only pdf, as I found the first time I tried it. This is the url to create a pdf of my blog (note "images=true")
http://fivefilters.org/pdf-newspaper/makepdf.php?images=true&feed=http%3A%2F%2Fsteveliles.blogspot.com%2F
And here's a sample of the result (click to download the full pdf ~1.3Mb):
"Work-Queue" Pattern for Work-flows
Related to my previous post on Approval Cycle's in work-flows, here's a shorter and more patterns-based discussion of work-queues. Again the GraphViz markup for the diagrams is available in this github gist.
For some background on Design Patterns see Christopher Alexander's Pattern Language book, or the famous "Gang of Four" Design Patterns
 book.
book.
Pattern-Name
Work-Queue
Intent
In a work-flow where tasks are handed over from one or more users to one or more other users, it is often the case that the person receiving the task cannot begin work on it right away, as they are busy with something else.
Sometimes we want to provide a means of hand-over that allows person A (the producer) to say "i'm done", so that they do not accumulate any more apparent time-spent on this task, but also we don't want person B (the consumer, or next recipient of the task) to immediately begin accumulating time-spent if they aren't actually working on the task yet.
Often the two sides of the queue are not balanced - there may be many more producers adding to the queue than consumers taking from it, or vice-versa.
Also known as
"Wait-State", "In-Tray", "To-Do's", "Async Hand-over", ... ?
Motivation
For the purposes of reporting, we want to isolate:
A typical reporting scenario might be to monitor performance of various groups or individuals against SLA's - for example there might be SLA's on the maximum amount of time a task may sit idle in the queue, and/or on the amount of time each task step should take to complete, or an SLA on the complete task.
Implementation
At its simplest this pattern involves just 3 states, one after the other, such that the producer completes his/her part of the task and submits to the work-queue, from which the consumer takes the task when ready.
Note that this says nothing about the number of users involved - there may be any number of producers and consumers, but in this configuration all tasks follow the same path to arrive at the queue. A slightly more complicated alternative entails tasks arriving in the queue having followed different paths through the work-flow prior to the queue, and likewise diverging again upon leaving the queue.
The multiplicity of states either side of the queue may change the criteria required for reporting (depending on whether you are interested in all paths or just one of the combinations), but in other respects the pattern is unaffected.
A nice possibility arises from having separated the phases of work with a work-queue: We can force a state-change if a task has waited too long in the queue (for example, to bump its priority somehow). This goes beyond the simple pattern described here, and probably needs another name to indicate that it is a Work-Queue with additional constraints - perhaps "Escalating Work-Queue"?
Known Uses
For some background on Design Patterns see Christopher Alexander's Pattern Language
Pattern-Name
Work-Queue
Intent
In a work-flow where tasks are handed over from one or more users to one or more other users, it is often the case that the person receiving the task cannot begin work on it right away, as they are busy with something else.
Sometimes we want to provide a means of hand-over that allows person A (the producer) to say "i'm done", so that they do not accumulate any more apparent time-spent on this task, but also we don't want person B (the consumer, or next recipient of the task) to immediately begin accumulating time-spent if they aren't actually working on the task yet.
Often the two sides of the queue are not balanced - there may be many more producers adding to the queue than consumers taking from it, or vice-versa.
Also known as
"Wait-State", "In-Tray", "To-Do's", "Async Hand-over", ... ?
Motivation
For the purposes of reporting, we want to isolate:
- The time the producer spends working on the task.
- The time at which the producer handed-off the task (put it in the queue).
- The time spent waiting for the task to be picked up and resumed by a consumer.
- The time at which the consumer took the task from the queue.
- The time spent by the consumer actually working on the next stage of the task.
A typical reporting scenario might be to monitor performance of various groups or individuals against SLA's - for example there might be SLA's on the maximum amount of time a task may sit idle in the queue, and/or on the amount of time each task step should take to complete, or an SLA on the complete task.
Implementation
At its simplest this pattern involves just 3 states, one after the other, such that the producer completes his/her part of the task and submits to the work-queue, from which the consumer takes the task when ready.
 |
| Fig1. Simple Work-Queue |
 |
| Fig2. Work-Queue with many paths in and out |
A nice possibility arises from having separated the phases of work with a work-queue: We can force a state-change if a task has waited too long in the queue (for example, to bump its priority somehow). This goes beyond the simple pattern described here, and probably needs another name to indicate that it is a Work-Queue with additional constraints - perhaps "Escalating Work-Queue"?
 |
| Fig3. Work-Queue with maximum wait-time threshold |
- Simply to mark a handover point, as an aid to configuration and visualisation of the steps in a work-flow.
- Isolating time-spent working from time-spent waiting for reporting purposes.
- Monitoring performance against Service-Level Agreements.
- Prevent some tasks idling in the queue for too long by bumping their priority when a certain wait-threshold is exceeded.
Sunday, 12 December 2010
Amazing trilobyte fossils
I was watching a David Attenborough program the other day on the origins of life on Earth. He visited a place in Morocco where some enterprising locals are grinding down a mountain of sandstone looking for trilobyte fossils which they clean up and sell, in some cases for thousands of dollars. These fossils are pretty small - easily fit in the palm of your hand - but the detail is amazing.

Click the image to go see the original on the smithsonianmag's blog (click the image again when you get there - they have an enormous hi-res image). Here's some more for your viewing pleasure.
Wikipedia, of course, has a very nice page on trilobytes with some more nice photos, notably this one of an eye column. Apparently the lenses are calcite (yes, they had eyes made of rock - before they were fossilized).
Now that's cool.
Saturday, 11 December 2010
More old sketches
Dug out a couple more old sketches.
I remember sitting at the kitchen table at my old house when I started this first one, which means it pre-dates March 2007 when I moved. Its drawn from a photo I took on a holiday with friends in Scotland in 2004 I think. Contrary to an earlier post my pencils aren't Derwent Studio's (oops), I checked and they are in fact Faber Castell Polychromos, which have a lovely soft feel, on 220gsm A2 (594mm x 420mm) Windsor & Newton heavyweight cartwridge paper.
The whole back-end of the squirrel is missing - can't squeeze enough into my A4 scanner (A4 is 1/4 the size of A2). I attempted to stitch a second scan onto this one to complete the squirrel, but the join is very clear to see, and i just can't summon the energy to wrestle The Gimp into blending the two images together nicely.
 |
| Red squirrel, colour pencil on A2, drawn from photo I took in Scotland in 2004. |
Again its Faber-Castell colour-pencil on Windsor & Newton A2, scanned by my A4 scanner so the legs (to the right of this section) and the tail (above this section) are cut off here.
 |
| Jaguar, colour pencil sketch, drawn from a photo I took in Mexico in 2002. |
Large, readable Newspaper & Magazine images with small file-sizes
A few months back we built a "prototype" iPhone app using only web technologies. The prototype has since gone on to be installed for several customers, hence the slightly sarcastic quotes. I think this is cool really - its not a huge app, and even though it was built on a short time-scale with some new technologies I think we did a reasonable job under the covers.
There are several interesting aspects of this app that I should write about separately, including things like making a web-app feel like a native app with a nice app icon on the home page, however this post is about some ideas we had for minimizing the download requirements for news-paper page images, whilst still allowing them to be zoomed in enough to be very readable.
The page images start life as pdf's. For various reasons that are not important to this post we had to convert them to images to use in our app, with the following constraints:
Here's a screenshot of one page of a pdf I made for the purposes of this post, using the excellent fivefilters.org service (free). The pdf for this page is 813kb.

To get some ballpark numbers for what might be achievable, we started out simply converting the pdf to a jpeg with imagemagick. Imagemagick is a great tool for all kinds of image manipulation, definitely worth checking out. Converting a pdf to jpeg is extremely easy - just a matter of invoking "convert":
That produces a relatively small filesize (215kb for the example page), with photos that look ... mm, ok-ish, to the not-overly critical eye, but of course jpeg is less than ideal for images of text. You end up with an awful lot of artifacts (jpeg'ing) in and around the text - an effect that is anything but easy on the eye.

Since its easy to experiment with, we tried a variety of different jpeg quality settings, largely to satisfy ourselves that a single jpeg couldn't really meet all of our requirements - either you get a large file-size with readable text, or a small filesize with horrible artifacts all over the textual parts of the image.
We also wondered if we could just do some tricks like using progressive jpegs to make the image appear to load quickly, and resolve to higher resolution versions as the download progressed. Sadly the iPhone at the time didn't support progressive jpegs (not sure if it does by now).
Next we looked at other image formats. Portable Network Graphic (png) images work nicely for photos and text - you don't get any nasty jpeg'ing, but inevitably the file-size is significantly larger than jpeg. On my sample page it's a whopping 9.1Mb (but it does look very nice).
Clearly what we really want is an image-format that combines the best of both using some kind of bi-level compression: jpeg-like compression for the colour-rich areas like photos, and png-like quality for the textual areas.
We did a bit of noodling around the web, looking for other image formats that might help out. The most likely candidate we found was JBIG2, which sounds like a really excellent format (check out that link to wikipedia), but sadly there's very little support for it - none of the web-browsers supported it at the time (and probably still don't, sorry i'm too lazy to check again now).
OK, satisfied that we'd done our due-diligence and that there wasn't a more easily available solution we started pondering options for solving the problem ourselves (hey, we're programmers, we gotta have some fun, right?
We had lots of nice ideas, for example: dissecting the image into regions containing only photos and only text, then stitching them back together at the client - like a google maps tile-based solution. This sounds like a lot of fun - an excellent excuse to play with image manipulation, edge detection and what-have-you, and if I get some time I intend to have a poke around and see how much better (or worse) it is than the solution we eventually came up with.
Somehow - I wish I'd written this back then, because I can't recall how the idea came about - we struck upon another, simpler, approach. A bit more experimenting with imagemagick and we soon had a working solution using only images, minimal coding, and resulted in readable text and ok-quality photos at approximately the same file-size as the original pdf. We were pretty pleased with that I can tell you, given that the smallest barely-readable jpage-2pg-only image was about 3 or 4 times larger than the original pdf.
Here's what we did: we realized early on that there were two completely separable components to our images: the colour photos, and the black & white text; and had been trying to separate them on the x-y planes of the image (if you know what i mean). Instead we looked at separating the components on the z-axis - ie. into two layers, one containing the coloured components, and the other containing the black & white.
This turns out to be a doddle with a few imagemagick incantations (I didn't make that up to sound funny, its what they are called!). First we extracted an image of the black & white parts, at the same resolution as the original. This will be our text component, so we want to save it as a png to keep the image-quality high and artifact free. Another reason for using png here is that we can set the white (background) part of the image to be transparent:
The threshold 1% cuts out everything but the very darkest of colours (very near black), and we're reducing the colour depth to make the file-size as small as possible. This gives me 117kb png for the example page. Next we did the opposite - set the black to transparent to create an image that only contains the coloured components of the image. Again we're using png in order to take advantage of its transparency capabilities:
Finally we flatten the image from png down to a relatively low quality jpg. Note that we can make the quality quite a bit lower than we did earlier, because we don't have to keep the text readable (it isn't even present in this image, we cut it out by filtering black out in the previous step).
Great, now we have two images: a "background" image which contains all of the coloured parts of the page, and a "foreground" image which contains only parts of the original that were black (surprisingly this almost always seems to be only text and borders of images, there's very little black in any of the photos. My example jpg is 81.9kb.
Two further optimisations can be made: run image optimiser's (e.g. pngcrush) on the resulting images. Pngcrush squeezed 3% out of my foreground png image, bringing it down to 113.7kb. I'm too tired to squash the jpeg now (it's past midnight, sorry).
When we layer those two images on top of each other we get back something that has decent quality photos, high quality text, and comes in at a fraction under 200kb. Layering the two images is very straight-forward with some simple html and css.
That was the best solution we came up with in the (very short) time we had to think about this. As it happens we didn't need to use it in the end, but it was a fun challenge to play with, and I had in mind to write something about it and to play with some of the other ideas at some point.
In the interests of full disclosure I have to say that I think we had much better results (in terms of quality) with the real newspaper pdf's than i'm getting with my example. I'm not really sure why that is, although it could be related to how my example pdf was created. Another major difference is that our real pdf's contained arabic text, which has a lot more fiddly bits in and around the characters, which increases the damaging effect of the jpeg'ing of the text.
There are several interesting aspects of this app that I should write about separately, including things like making a web-app feel like a native app with a nice app icon on the home page, however this post is about some ideas we had for minimizing the download requirements for news-paper page images, whilst still allowing them to be zoomed in enough to be very readable.
The page images start life as pdf's. For various reasons that are not important to this post we had to convert them to images to use in our app, with the following constraints:
- the photos, cartoons, etc., (full colour) must be retained in sufficient quality to be pleasing to the eye.
- the text (black on white) on the pages must be retained in sufficient quality to be clearly readable when zoomed on an iphone.
- loading and rendering the image should be as speedy as possible.
Here's a screenshot of one page of a pdf I made for the purposes of this post, using the excellent fivefilters.org service (free). The pdf for this page is 813kb.

To get some ballpark numbers for what might be achievable, we started out simply converting the pdf to a jpeg with imagemagick. Imagemagick is a great tool for all kinds of image manipulation, definitely worth checking out. Converting a pdf to jpeg is extremely easy - just a matter of invoking "convert":
convert -density 300 -quality 7 test.pdf test.jpg
That produces a relatively small filesize (215kb for the example page), with photos that look ... mm, ok-ish, to the not-overly critical eye, but of course jpeg is less than ideal for images of text. You end up with an awful lot of artifacts (jpeg'ing) in and around the text - an effect that is anything but easy on the eye.
Since its easy to experiment with, we tried a variety of different jpeg quality settings, largely to satisfy ourselves that a single jpeg couldn't really meet all of our requirements - either you get a large file-size with readable text, or a small filesize with horrible artifacts all over the textual parts of the image.
We also wondered if we could just do some tricks like using progressive jpegs to make the image appear to load quickly, and resolve to higher resolution versions as the download progressed. Sadly the iPhone at the time didn't support progressive jpegs (not sure if it does by now).
Next we looked at other image formats. Portable Network Graphic (png) images work nicely for photos and text - you don't get any nasty jpeg'ing, but inevitably the file-size is significantly larger than jpeg. On my sample page it's a whopping 9.1Mb (but it does look very nice).
Clearly what we really want is an image-format that combines the best of both using some kind of bi-level compression: jpeg-like compression for the colour-rich areas like photos, and png-like quality for the textual areas.
We did a bit of noodling around the web, looking for other image formats that might help out. The most likely candidate we found was JBIG2, which sounds like a really excellent format (check out that link to wikipedia), but sadly there's very little support for it - none of the web-browsers supported it at the time (and probably still don't, sorry i'm too lazy to check again now).
OK, satisfied that we'd done our due-diligence and that there wasn't a more easily available solution we started pondering options for solving the problem ourselves (hey, we're programmers, we gotta have some fun, right?
We had lots of nice ideas, for example: dissecting the image into regions containing only photos and only text, then stitching them back together at the client - like a google maps tile-based solution. This sounds like a lot of fun - an excellent excuse to play with image manipulation, edge detection and what-have-you, and if I get some time I intend to have a poke around and see how much better (or worse) it is than the solution we eventually came up with.
Somehow - I wish I'd written this back then, because I can't recall how the idea came about - we struck upon another, simpler, approach. A bit more experimenting with imagemagick and we soon had a working solution using only images, minimal coding, and resulted in readable text and ok-quality photos at approximately the same file-size as the original pdf. We were pretty pleased with that I can tell you, given that the smallest barely-readable jpage-2pg-only image was about 3 or 4 times larger than the original pdf.
Here's what we did: we realized early on that there were two completely separable components to our images: the colour photos, and the black & white text; and had been trying to separate them on the x-y planes of the image (if you know what i mean). Instead we looked at separating the components on the z-axis - ie. into two layers, one containing the coloured components, and the other containing the black & white.
This turns out to be a doddle with a few imagemagick incantations (I didn't make that up to sound funny, its what they are called!). First we extracted an image of the black & white parts, at the same resolution as the original. This will be our text component, so we want to save it as a png to keep the image-quality high and artifact free. Another reason for using png here is that we can set the white (background) part of the image to be transparent:
convert -density 300 test.pdf -threshold 5% -depth 8 -colors 16 -transparent white test.png
The threshold 1% cuts out everything but the very darkest of colours (very near black), and we're reducing the colour depth to make the file-size as small as possible. This gives me 117kb png for the example page. Next we did the opposite - set the black to transparent to create an image that only contains the coloured components of the image. Again we're using png in order to take advantage of its transparency capabilities:
convert -density 300 test.pdf -transparent black back.png
Finally we flatten the image from png down to a relatively low quality jpg. Note that we can make the quality quite a bit lower than we did earlier, because we don't have to keep the text readable (it isn't even present in this image, we cut it out by filtering black out in the previous step).
convert back.png -background white -flatten -quality 9 back.jpg
Great, now we have two images: a "background" image which contains all of the coloured parts of the page, and a "foreground" image which contains only parts of the original that were black (surprisingly this almost always seems to be only text and borders of images, there's very little black in any of the photos. My example jpg is 81.9kb.
Two further optimisations can be made: run image optimiser's (e.g. pngcrush) on the resulting images. Pngcrush squeezed 3% out of my foreground png image, bringing it down to 113.7kb. I'm too tired to squash the jpeg now (it's past midnight, sorry).
When we layer those two images on top of each other we get back something that has decent quality photos, high quality text, and comes in at a fraction under 200kb. Layering the two images is very straight-forward with some simple html and css.
That was the best solution we came up with in the (very short) time we had to think about this. As it happens we didn't need to use it in the end, but it was a fun challenge to play with, and I had in mind to write something about it and to play with some of the other ideas at some point.
In the interests of full disclosure I have to say that I think we had much better results (in terms of quality) with the real newspaper pdf's than i'm getting with my example. I'm not really sure why that is, although it could be related to how my example pdf was created. Another major difference is that our real pdf's contained arabic text, which has a lot more fiddly bits in and around the characters, which increases the damaging effect of the jpeg'ing of the text.
Friday, 10 December 2010
Patterns for Approval Cycles in Work-flows
Spent quite some time building a Work-flow/Reporting tool recently. Took an hour out from coding to think about a common use-case for the sorts of work-flows we typically encounter in our field: Approval cycles. Any excuse to take GraphViz for a spin :)
For the moment this is just looking at what kind of cycles we might encounter, rather than how to configure the system to handle them. I'm pretty confident we can deal with all of these scenario's without any further development.
All of the diagrams here were generated with GraphViz. The "dot" markup for all of the diagrams can be found in this github gist.
Lets start with the most basic approval cycle I can imagine: either your work gets approved and moves forward in the work-flow, or it doesn't and is returned to you for re-work:
Another simple work-flow might entail two phases of checking - possibly just double-checking for the same mistakes or whatever, but also perhaps because the first-pass can be done by someone less qualified, in order to weed out the obvious errors and save the valuable time of a more qualified person for more significant problems. Here's what that could look like:
Nice. Recording these states (with any number of do's and check's) is a good start, but what if you want to make it easy to spot or report on cases where re-work was required?
Why would we want to do this? Well, maybe to find out what kind of tasks typically cause problems so that we can address those tasks with new approaches or tools, or to find out who amongst the work-force might be a candidate for re-training (lots of re-do's) or bonus (few re-do's).
To achieve this you could just count the number of instances of "do" or "approval" in the life-cycle of a single task. Sure, that'll work, but another possibility (which I feel better about, and think is worth exploring more) is to introduce extra states in your work-flow, something like this:

For the moment this is just looking at what kind of cycles we might encounter, rather than how to configure the system to handle them. I'm pretty confident we can deal with all of these scenario's without any further development.
All of the diagrams here were generated with GraphViz. The "dot" markup for all of the diagrams can be found in this github gist.
Lets start with the most basic approval cycle I can imagine: either your work gets approved and moves forward in the work-flow, or it doesn't and is returned to you for re-work:
 |
| Basic Approval Cycle |
 |
| Double-checked Approval Cycle |
Why would we want to do this? Well, maybe to find out what kind of tasks typically cause problems so that we can address those tasks with new approaches or tools, or to find out who amongst the work-force might be a candidate for re-training (lots of re-do's) or bonus (few re-do's).
To achieve this you could just count the number of instances of "do" or "approval" in the life-cycle of a single task. Sure, that'll work, but another possibility (which I feel better about, and think is worth exploring more) is to introduce extra states in your work-flow, something like this:
 |
| Approval Cycle with Explicit Redo State |
Great, now we have a specific state (re-do) that we can search for when reporting, or spot at a glance when looking at an overview of the life-cycle of a task in the work-flow, which enables us to pick out those tasks that did not pass muster at the first attempt.
Going back to our earlier example of multiple levels of checking by less/more qualified persons, we can use the same technique to isolate re-do attempts, this time capturing the level at which the re-do takes place:
 |
| Double-checked Approval Cycle with Explicit Redo States |
We can take this concept further: what if its ok to make a mistake or two, but what you really want to know is what are the particularly tricky or badly handled tasks? Again, you could do this just by counting the number of times the same task passes through the "do" or "approval" states, or you could make it explicit in your work-flow.
I'll try and show how this can be a good thing to do by the end of this post but, for now, nod, smile, and bear with me. I'll go back to just one level of checking (dropping the junior/senior distinction) to keep this from getting too complicated too quickly:
 |
| Approval Cycle with Redo State Tracking |
OK, what's going on here? From "do" we shift to "approval", from which our work can be "approved" directly, or refused. Following the initial refusal from "approval" we shift to the "1st re-do" state, from which the only means of moving forward is to shift to "2nd approval".
We can use "1st re-do" to report on, say, tasks that did not get approved at the first go. At "2nd approval" we can jump directly to approved, or shift into "2+ re-dos". Reporting on "2nd approval" gives us a means to find (or filter out) tasks that took at least 2 attempts to get approved.
Finally, from "2+ re-dos" we shuttle back and forth with "2+ approvals", until eventually we get approved. We could introduce more levels of course, but my suspicion is anything that requires 2+ re-do's is a big warning sign that there's a significant problem that more levels of recording won't help to resolve.
Where to go from here? Well, this is where some of the benefits of the "explicit in the work-flow" approach could be realized. For example, so far I've just had a single goal-state: "approved". Given that an approval cycle is probably, or at least potentially, just a small part of a larger overall work-flow, we might propagate to different parts of that larger work-flow depending on the path we take through the approval-cycle. I don't want to introduce too much complexity here, so lets keep it simple by having a set of different goal-states to illustrate the point ...
 |
| Approval Cycle with redo-directed alternate forward-path |
Hopefully that's fairly self-explanatory. The important point to note here is that by designing the work-flow to capture these additional states separately we can follow a completely different forward path at various points if we need to. A more realistic/useful possibility that I wish I had diagrammed might be re-assigning the task to a different user if we fail at the 2nd approval.
I want to mention at this point that this might look like its getting pretty complicated already, but the people involved in the work-flow do not see any of this complexity. The person performing the task will perform the task, then submit it for approval. Occasionally a task might come back for re-work. For the person doing the approving, he/she either approves or does not. The system takes care of the rest.
There's one other alternative that I drew up, which opens a whole 'nother topic (subject for a different post I think!). This one involves using a "queue" to do things like hand-off tasks to any of a number of alternative users who can fulfil the next stage of a task's lifecycle, and/or to measure things like wait-times before the next stage of the lifecycle really begins. I think queue's could be really useful as tools for identifying bottlenecks and reporting on SLA targets.
Here's what the diagram looks like for the case where a task is added to an approval-queue (I called it "checking queue" in the diagram, and now i'm too tired to change it). Here I've gone back to the multi-level approval cycle, chewing over the idea that there may be a large number of "junior" checkers, but far fewer senior checkers.

My aim in writing this was to discuss patterns (in the Christopher Alexander
sense) for what the sub-work-flow for an approval cycle might look like. On reflection I think I could have done much better at laying these things out as patterns - ie. giving them names and describing the forces and all that. I've gone back and captioned the graphs to add some flavour of pattern-name. Hopefully the discussion was useful and the language and terminology sufficiently abstract from our implementation to keep from getting embroiled in implementation details.
sense) for what the sub-work-flow for an approval cycle might look like. On reflection I think I could have done much better at laying these things out as patterns - ie. giving them names and describing the forces and all that. I've gone back and captioned the graphs to add some flavour of pattern-name. Hopefully the discussion was useful and the language and terminology sufficiently abstract from our implementation to keep from getting embroiled in implementation details.
Tuesday, 7 December 2010
Using non-standard css properties in GWT
Sometimes you'll want to use a non-standard CSS property in GWT - say to use rounded-corners on your borders using -moz-border-radius and -webkit-border-radius.
However, if you just plonk those properties in your CSSResource you're in for some warnings. GWT doesn't like property names that start with "-". The solution is very simple: escape the leading "-" with a "\", e.g. \-moz-border-radius: 5px.
However, if you just plonk those properties in your CSSResource you're in for some warnings. GWT doesn't like property names that start with "-". The solution is very simple: escape the leading "-" with a "\", e.g. \-moz-border-radius: 5px.
Monday, 6 December 2010
Dumping and restoring mysql db's
Dump a db with:
To import, first create the target db, then import the dump with:
Yep, its that easy.
mysqldump -h<host-name-or-ip> -u<username> -p<password> <database-name> > dump.sql
To import, first create the target db, then import the dump with:
mysql -h<host-name-or-ip> -u<username> -p<password> <database-name> < dump.sql
Yep, its that easy.
Tuesday, 2 November 2010
How to list interesting info about your cpu in linux
cat /proc/cpuinfo
example output:
processor : 0
vendor_id : GenuineIntel
cpu family : 6
model : 26
model name : Intel(R) Core(TM) i7 CPU 930 @ 2.80GHz
stepping : 5
cpu MHz : 1600.000
cache size : 8192 KB
physical id : 0
siblings : 8
core id : 0
cpu cores : 4
apicid : 0
initial apicid : 0
fpu : yes
fpu_exception : yes
cpuid level : 11
wp : yes
flags : fpu vme de pse tsc msr pae mce cx8 apic sep mtrr pge mca cmov pat pse36 clflush dts acpi mmx fxsr sse sse2 ss ht tm pbe syscall nx rdtscp lm constant_tsc arch_perfmon pebs bts rep_good xtopology nonstop_tsc aperfmperf pni dtes64 monitor ds_cpl vmx est tm2 ssse3 cx16 xtpr pdcm sse4_1 sse4_2 popcnt lahf_lm ida tpr_shadow vnmi flexpriority ept vpid
bogomips : 5612.15
clflush size : 64
cache_alignment : 64
address sizes : 36 bits physical, 48 bits virtual
power management:
processor : 1
vendor_id : GenuineIntel
cpu family : 6
... etc
How to clear memory caches in ubuntu
While performance testing some mysql queries in ubuntu I came across the old problem that even after restarting mysql to clear its own buffers, the OS caches speed up consecutive runs of the same query. In order to get consistent results you need to flush both the mysql buffers and the native OS buffers.
Flushing the mysql buffers is as easy as restarting mysql ("sudo service mysql restart" in Maverick). Flushing the OS buffers is also dead easy:
I have system-monitor gauges on my taskbar showing cpu, memory and disk activity, and its a beautiful thing to see the cache suddenly get wiped :)
Flushing the mysql buffers is as easy as restarting mysql ("sudo service mysql restart" in Maverick). Flushing the OS buffers is also dead easy:
sudo sh -c "sync; echo 3 > /proc/sys/vm/drop_caches"
I have system-monitor gauges on my taskbar showing cpu, memory and disk activity, and its a beautiful thing to see the cache suddenly get wiped :)
Saturday, 30 October 2010
Some old sketches ...
I decided it was high time I got a copy of my photos from the last 10 years or so backed-up somewhere. I downloaded Picasa (3.0-beta for ubuntu x64) and signed up for web-albums and started rummaging through my pics. Picasa tells me I have 5,773 pictures in my ~/Pictures directory, so I could be having to spend rather a long time sorting through that lot!
Scrolling through I came across some old sketches from way back (2002 and older), some of which I had scanned at various stages during the sketch. After a bit of fighting with Picasa (I didn't want it to throw away my original tif files) I got it to pick up the extra converted jpg copies which i made, and tried to upload them ... no go on that score, its still doing incrementally backing-off retries and failing to upload with no explanation. The log file location says "c:\Documents and settings...", which is a bit of a laugh given i'm running ubuntu :)
Instead I uploaded those converted jpg's via the web-albums website, and shared the album. Here's a sample:
Honestly no idea why the last one has a blue-ish tint to it - I must have screwed up scanning it or something. I'll balance the colours and re-upload if I get a chance.
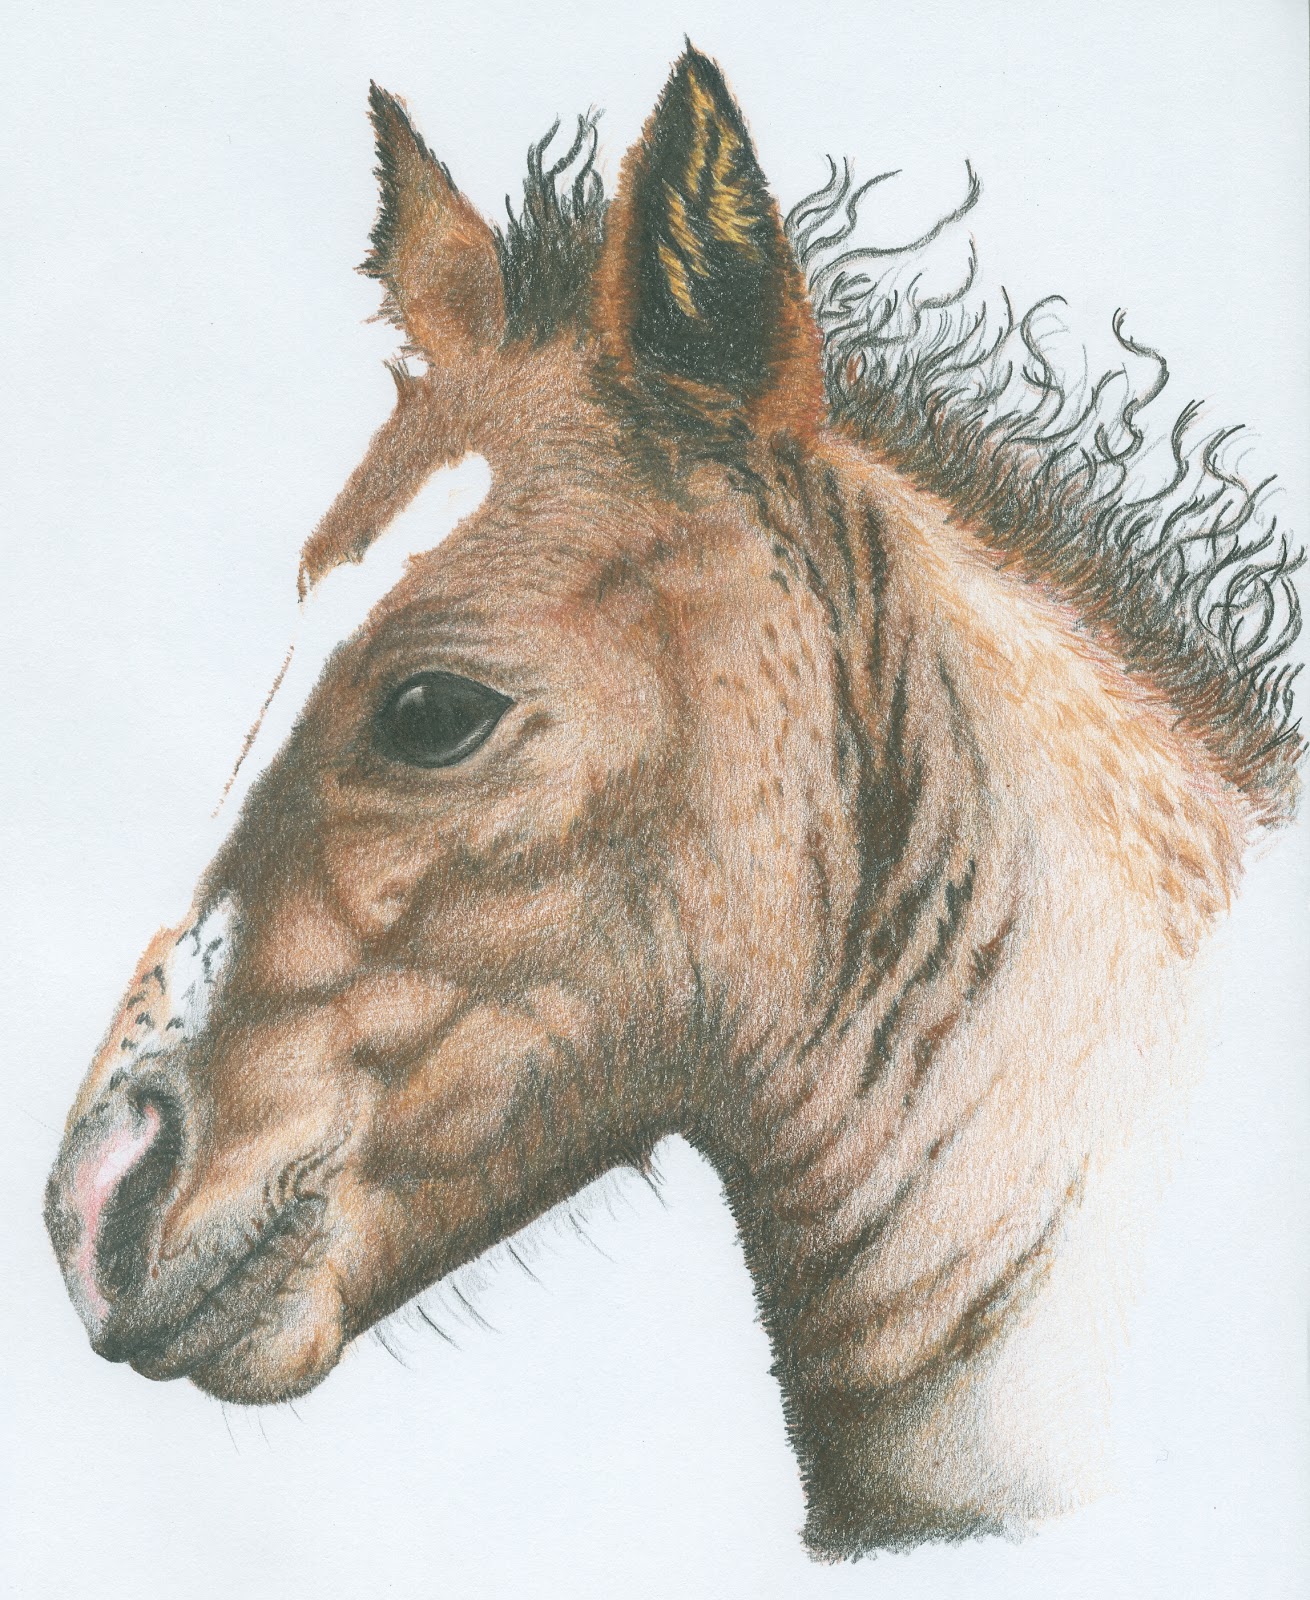
This was drawn from a photo I took at Llyn-Brianne in mid Wales, some time around 2002. There was a whole herd of what I can only assume are wild ponies just wandering around up there, and this little guy was one of them.
This sketch is a full side of A4, drawn with Derwent studio colour pencils. I saw someone drawing with these at an art show I went to with my dad years ago, and bought the 72 pack there and then - they really are fantastic.
Scrolling through I came across some old sketches from way back (2002 and older), some of which I had scanned at various stages during the sketch. After a bit of fighting with Picasa (I didn't want it to throw away my original tif files) I got it to pick up the extra converted jpg copies which i made, and tried to upload them ... no go on that score, its still doing incrementally backing-off retries and failing to upload with no explanation. The log file location says "c:\Documents and settings...", which is a bit of a laugh given i'm running ubuntu :)
Instead I uploaded those converted jpg's via the web-albums website, and shared the album. Here's a sample:
|
|
|


Honestly no idea why the last one has a blue-ish tint to it - I must have screwed up scanning it or something. I'll balance the colours and re-upload if I get a chance.
This was drawn from a photo I took at Llyn-Brianne in mid Wales, some time around 2002. There was a whole herd of what I can only assume are wild ponies just wandering around up there, and this little guy was one of them.
This sketch is a full side of A4, drawn with Derwent studio colour pencils. I saw someone drawing with these at an art show I went to with my dad years ago, and bought the 72 pack there and then - they really are fantastic.
Monday, 25 October 2010
Making pretty diagrams with GraphViz
So recently I needed to draw some directed-graph diagrams - work-flow diagrams in this particular instance. After a bit of googling I came across some nice examples of diagrams produced by graphviz - actually what really turned me on to graphviz was this nice set of examples from Kent Bye.
A little tinkering and I soon had my workflow definitions (declared in xml in our application) rendered nicely with GraphViz. The markup language is deadly simple and intuitive, and the directed graphs - I didn't try anything else - which it produces are really good looking.
Lets take a look at some examples, starting simply with two nodes related in one direction only. The markup would look like this:
digraph {
"Start" -> "End" [];
}
That's it. No really. This is all you need to create a simple, two-node directed graph diagram. To draw the diagram you need to install graphviz (with a quality OS like ubuntu you just need the magic incantation "sudo apt-get install graphviz" and you're up and running. Once installed invoke graphviz like this:
dot -Tpng -oMyGraph.png MyGraph.dot
This invokes the directed-graph drawing tool, tells it to produce a png image from the input file "MyGraph.dot" and store it in the output file "MyGraph.png". The resulting diagram looks like this:
 Coolness!
Lets get a bit trickier. We can control the size and shape of our nodes, and label the edges:
digraph {
"A" [shape="circle"];
"B" [shape="rectangle"];
"C" [shape="diamond"];
"A" -> "B" [label="A to B"];
"B" -> "C" [label="B to C"];
"A" -> "B" [label="A to C"];
}
Here's the diagram:
 Isn't it just too cool? Last one coming up - this time with colours:
And here's how it looks:
 I realize this just scratches the surface - there's a whole bunch of other node shapes you can use, you can define defaults for nodes and edges once at the beginning of your *.dot file, and much much more.
I only discovered GraphViz about 2 months ago, but since I did i've been using it quite a lot. Its very handy for drawing simple representations of work-flows, navigational flows, any kind of hierarchical structures (trees and graphs), etc., and just so simple to write. Generating the *.dot syntax programmatically is extremely easy - I now have our app invoking "dot" to generate the graphs on the fly.
Note: Google Charts now has experimental support for (a subset of) graphviz. Check it out here.You don't even have to install graphviz :)
A little tinkering and I soon had my workflow definitions (declared in xml in our application) rendered nicely with GraphViz. The markup language is deadly simple and intuitive, and the directed graphs - I didn't try anything else - which it produces are really good looking.
Lets take a look at some examples, starting simply with two nodes related in one direction only. The markup would look like this:
digraph {
"Start" -> "End" [];
}
That's it. No really. This is all you need to create a simple, two-node directed graph diagram. To draw the diagram you need to install graphviz (with a quality OS like ubuntu you just need the magic incantation "sudo apt-get install graphviz" and you're up and running. Once installed invoke graphviz like this:
dot -Tpng -oMyGraph.png MyGraph.dot
This invokes the directed-graph drawing tool, tells it to produce a png image from the input file "MyGraph.dot" and store it in the output file "MyGraph.png". The resulting diagram looks like this:
Lets get a bit trickier. We can control the size and shape of our nodes, and label the edges:
digraph {
"A" [shape="circle"];
"B" [shape="rectangle"];
"C" [shape="diamond"];
"A" -> "B" [label="A to B"];
"B" -> "C" [label="B to C"];
"A" -> "B" [label="A to C"];
}
Here's the diagram:

digraph {
"Back" [shape="egg" color="green" style="filled" fillcolor="yellow"];
"Forth" [shape="house" color="red"];
"Other" [shape="invtriangle" color="blue"];
"Back" -> "Forth" [color="orange" label="weee"];
"Forth" -> "Back" [color="purple" label="eeew"];
"Other" -> "Forth"
"Other" -> "Back"
}
"Back" [shape="egg" color="green" style="filled" fillcolor="yellow"];
"Forth" [shape="house" color="red"];
"Other" [shape="invtriangle" color="blue"];
"Back" -> "Forth" [color="orange" label="weee"];
"Forth" -> "Back" [color="purple" label="eeew"];
"Other" -> "Forth"
"Other" -> "Back"
}
And here's how it looks:

I only discovered GraphViz about 2 months ago, but since I did i've been using it quite a lot. Its very handy for drawing simple representations of work-flows, navigational flows, any kind of hierarchical structures (trees and graphs), etc., and just so simple to write. Generating the *.dot syntax programmatically is extremely easy - I now have our app invoking "dot" to generate the graphs on the fly.
Note: Google Charts now has experimental support for (a subset of) graphviz. Check it out here.You don't even have to install graphviz :)
Saturday, 16 October 2010
GWT Widgets with html id attributes
It isn't immediately obvious how to get your GWT widgets to produce id attributes that you can use from external scripts or testing tools like WebDriver or Selenium.
To make your widgets produce id attributes you need to invoke the ensureDebugId method with an id string, e.g.
Now, if you run that you still won't get any id attributes. The clue is in the method name ensureDebugId. You actually need to inherit the Debug module in your module descriptor (.gwt.xml) file. The module to inherit is:
Now if you view the source of your label you'll see that it has an id attribute, but you might be surprised that it doesn't quite match the id you supplied ("myLabel"). In fact it will say "gwt-debug-myLabel".
To make your widgets produce id attributes you need to invoke the ensureDebugId method with an id string, e.g.
Label myLabel = new Label("Say something");
myLabel.ensureDebugId("myLabel");
Now, if you run that you still won't get any id attributes. The clue is in the method name ensureDebugId. You actually need to inherit the Debug module in your module descriptor (.gwt.xml) file. The module to inherit is:
<inherits name="com.google.gwt.user.Debug"/>
Now if you view the source of your label you'll see that it has an id attribute, but you might be surprised that it doesn't quite match the id you supplied ("myLabel"). In fact it will say "gwt-debug-myLabel".
Testing GWT OOPHM with WebDriver
Reminder to self: When testing GWT OOPHM with WebDriver, don't use the HtmlUnitDriver you damned fool - it does not have a GWT plugin, so it just sees the bootstrap html and nothing more than that. To test in OOPHM with WebDriver you have to use a real browser that has a GWT plugin :)
Testing GWT apps with WebDriver
Today I've been playing a little with WebDriver for testing GWT apps. First impressions:
To get started I made a new toy project to play in. I don't use the Google Eclipse plugins for GWT dev - if you do you could create this project using the wizards instead. I develop in Eclipse, but always set up my projects with Maven, so the first step for me was to create a new maven project:
mvn archetype:create -DgroupId=com.sjl -DartifactId=webdriver
mvn eclipse:eclipse
<dependency>
<groupId>org.seleniumhq.selenium</groupId>
<artifactId>selenium</artifactId>
<version>2.0a4</version>
</dependency>
mvn eclipse:eclipse
Pushing the button adds a new Label for each push - something we should be able to detect pretty easily.
My gwt module file looks like this:
Next I made an "ApplicationDriver" class to wrap up the details of getting WebDriver to interact with the web app and let our tests deal with the web app in terms of a ubiquitous domain language - overkill for this simple example i'm sure, but if you want to write expressive tests for a complex web app you really need to do so at a higher level than WebDriver invocations. The ApplicationDriver class looks like this:
Now there are a few things worth noting here, as it took me a while to arrive at this point with something that actually worked.
First of all, notice that i'm using the FirefoxDriver implementation. I had started out with HtmlUnitDriver which works just fine for testing a compiled GWT app (provided you create it with javascript support - new HtmlUnitDriver(true), and ignore the warnings about x-javascript) but I wanted to test during development by running OOPHM. Stupidly I was trying to get this to work with the HtmlUnitDriver for a while, til I had a Homer Simpson moment (doh!) and realized that of course HtmlUnitDriver can't work - it doesn't have a GWT plugin :).
Secondly, the FirefoxDriver implementation starts up an instance of Firefox with a profile called "WebDriver". If you don't have a profile with that name Firefox will create one when it starts, but it won't have any of your plugins (including the GWT plugin!). Its easy to create a new profile (close all instances of firefox down completely then run it from the cmdline with the -profilemanager switch) - precise instructions vary by platform. I created the profile then just copied my existing profile contents to it to save installing all the plugins again. In the sample code above i've told WebDriver to use the "default" profile instead by setting a system property.
Finally, note that I'm finding the PushButton by id lookup. To make this work you have to force GWT to spit out an id for the element, and allow for the fact that GWT adds a prefix ("gwt-debug-") to the id you specify. To force GWT to produce id's for your Widget elements:
Finally I built the testcase on top of the ApplicationDriver, starting with a test to detect the first Label, then a test to click the PushButton and check that a new Label is added. The testcase looks like this:
That's it ... start up GWT OOPHM, run the Junit testcase, and marvel as Firefox starts up, runs the app, and shuts down again (3 times - once for each test), leaving you with a nice green bar in JUnit. I'm sure that restarting firefox between each test would be a bad idea - slooooow - in practice, I just wanted to try it to see that it worked :)
The next interesting test to play with will be testing asynchronous activity like AJAX requests. I'm hoping there'll be some nice Patterns described by the WebDriver community for writing such tests.
- WebDriver is awesome - can't wait to try testing more complex web-apps!
- WebDriver opens up all kinds of possibilities beyond testing web-apps - for example to drive interactive demos and tutorials.
- Did I mention WebDriver is awesome? :)
Preparing the Eclipse project
To get started I made a new toy project to play in. I don't use the Google Eclipse plugins for GWT dev - if you do you could create this project using the wizards instead. I develop in Eclipse, but always set up my projects with Maven, so the first step for me was to create a new maven project:
mvn archetype:create -DgroupId=com.sjl -DartifactId=webdriver
Next, create the Eclipse project so I can use eclipse to edit the maven pom...
mvn eclipse:eclipse
And then edit pom.xml in Eclipse to add the GWT, JUnit4 and WebDriver dependencies (by default maven adds JUnit 3.8, so I replace that with JUnit 4.4).
To add the GWT dependencies you also need a repository that actually has them - I use the CodeHaus gwt maven plugins during the build step, which also exposes the CodeHaus repository for fetching the dependences:
<pluginRepositories>
<pluginRepository>
<id>codehaus-snapshots</id>
<name>Codehaus plugin snapshot repository</name>
<url>http://snapshots.repository.codehaus.org</url>
</pluginRepository>
</pluginRepositories>
<pluginRepository>
<id>codehaus-snapshots</id>
<name>Codehaus plugin snapshot repository</name>
<url>http://snapshots.repository.codehaus.org</url>
</pluginRepository>
</pluginRepositories>
...
<dependencies>
<dependency>
<groupId>com.google.gwt</groupId>
<artifactId>gwt-dev</artifactId>
<version>2.0.4</version>
<optional>true</optional>
</dependency>
<dependency>
<groupId>com.google.gwt</groupId>
<artifactId>gwt-user</artifactId>
<version>2.0.4</version>
<scope>provided</scope>
</dependency>
...<groupId>com.google.gwt</groupId>
<artifactId>gwt-dev</artifactId>
<version>2.0.4</version>
<optional>true</optional>
</dependency>
<dependency>
<groupId>com.google.gwt</groupId>
<artifactId>gwt-user</artifactId>
<version>2.0.4</version>
<scope>provided</scope>
</dependency>
Next the WebDriver dependencies - I got these as transitive dependencies of selenium2:
<dependency>
<groupId>org.seleniumhq.selenium</groupId>
<artifactId>selenium</artifactId>
<version>2.0a4</version>
</dependency>
Having edited the pom.xml file you need to rebuild the eclipse project using the eclipse maven plugin:
mvn eclipse:eclipse
This will take a little while to download the dependencies if you don't already have them - the gwt dependencies in particular are quite large. Once the command completes you need to refresh the project in Eclipse for it to reload the project classpath.
Creating a simple GWT app
I made a really simple application to play with, consisting of just an EntryPoint that displays a Label, and a PushButton which adds more Label's when clicked. I had just a handful of aims in mind for this first attempt:
- Get a GWT app to load via WebDriver
- Find an element which GWT has created (the first Label)
- Interact with an element that does something (the PushButton)
- Check that the something actually happened and that we can test for it.
Pushing the button adds a new Label for each push - something we should be able to detect pretty easily.
My gwt module file looks like this:
Next I made an "ApplicationDriver" class to wrap up the details of getting WebDriver to interact with the web app and let our tests deal with the web app in terms of a ubiquitous domain language - overkill for this simple example i'm sure, but if you want to write expressive tests for a complex web app you really need to do so at a higher level than WebDriver invocations. The ApplicationDriver class looks like this:
Now there are a few things worth noting here, as it took me a while to arrive at this point with something that actually worked.
First of all, notice that i'm using the FirefoxDriver implementation. I had started out with HtmlUnitDriver which works just fine for testing a compiled GWT app (provided you create it with javascript support - new HtmlUnitDriver(true), and ignore the warnings about x-javascript) but I wanted to test during development by running OOPHM. Stupidly I was trying to get this to work with the HtmlUnitDriver for a while, til I had a Homer Simpson moment (doh!) and realized that of course HtmlUnitDriver can't work - it doesn't have a GWT plugin :).
Secondly, the FirefoxDriver implementation starts up an instance of Firefox with a profile called "WebDriver". If you don't have a profile with that name Firefox will create one when it starts, but it won't have any of your plugins (including the GWT plugin!). Its easy to create a new profile (close all instances of firefox down completely then run it from the cmdline with the -profilemanager switch) - precise instructions vary by platform. I created the profile then just copied my existing profile contents to it to save installing all the plugins again. In the sample code above i've told WebDriver to use the "default" profile instead by setting a system property.
Finally, note that I'm finding the PushButton by id lookup. To make this work you have to force GWT to spit out an id for the element, and allow for the fact that GWT adds a prefix ("gwt-debug-") to the id you specify. To force GWT to produce id's for your Widget elements:
- Inherit the Debug module in your module descriptor file (.gwt.xml)
- Set an id on the Widget using widget.ensureDebugId("theId");
Finally I built the testcase on top of the ApplicationDriver, starting with a test to detect the first Label, then a test to click the PushButton and check that a new Label is added. The testcase looks like this:
That's it ... start up GWT OOPHM, run the Junit testcase, and marvel as Firefox starts up, runs the app, and shuts down again (3 times - once for each test), leaving you with a nice green bar in JUnit. I'm sure that restarting firefox between each test would be a bad idea - slooooow - in practice, I just wanted to try it to see that it worked :)
The next interesting test to play with will be testing asynchronous activity like AJAX requests. I'm hoping there'll be some nice Patterns described by the WebDriver community for writing such tests.
Tuesday, 12 October 2010
I had an idea...
... for carrying a profile around the web, using hovercards to display some info about you wherever you leave a comment or whatever. A quick google shows i'm too late again - Gravatar beat me to it (grrr). They've done a nice job of it though.
Monday, 4 October 2010
Best monospace font for programming?
Back in the day, when I ran Windoze XP on my development machines, I used to use the wonderful "Consolas" font developed by Microsoft.
Since switching to Ubuntu some, uhhh ... 3 years ago, I've been using the free Inconsolata font - and I agree with kvz, it is very nice. One small problem with it for development is it isn't monospaced - though I don't notice it causing me any real problems.
Anyways, lately I've been playing with Liberation mono instead, which is monospaced, and so far i'm liking it a lot. In IntelliJ/JetBrains Idea i'm running it at 17pt, which looks super-smooth and readable on my 17" 1080p laptop.
To install Liberation in ubuntu:
sudo apt-get install ttf-liberation
When Llama's attack
So I was cycling home the other night, it was dark and drizzling. Around half-way home my journey takes me past an Agricultural College, which has a few small fields of livestock.
As I passed one particular field a large, black, something loped towards me, with exactly the gait of the chimps in Planet of the Apes. Man I nearly fell off my bike, but then I realized - as it got closer - what it was: a damn Llama.
Those creatures have the weirdest gait! Must be all those extra knees (see Pyramids).
Transforming Java Collections
So I posted last time about filtering Java Collections using a "functional" approach. Today I'll look at another useful operation - transformation.
This is slightly more complicated than filtering, but not much. The problem this time is to take a List of Object's of some Type, and transform it into a List of Object's of a different Type. For example, convert a List of ReallyComplexObject's to a List of EquallyComplexObject's:
Of course there are many alternative ways to write this. Not least you should factor out the creation of the EquallyComplexObject to a separate method that would be invoked in the for loop. I took a similar approach with transformation that I used for filtering, and arrived at:
Again, the expressiveness of this really shines when you factor the Transformer out into a separate class, or create it in a separate method. Our client code becomes:
To support this the Util class gets a few extra bits and pieces:
Its turned out to be surprisingly useful - i'm already using it in lots of places and finding the results pleasingly readable. The biggest gain, to my mind, is that you get to code at a higher level of abstraction because in each case you don't have to think about the mechanics of iterating the original List's.
Yes I know its ridiculously simple to iterate a for loop, and where the predicate or transformation is simple the alternative presented here appears to have dubious value, but somehow making a "Filter" or a "Transformer" that focuses on how to filter or transform just one object is ... well, its transformative. Try it, you might like it :)
Saturday, 2 October 2010
Filtering Java Collections
OK, its my first ever blog post, so no laughing - gotta start somewhere, right? It doesn't help that the cat is tap-dancing on my keyboard at every opportunity.
Anyways, I recently made a couple of handy utility methods and classes for filtering and transforming java.util.List's (well, Iterable's actually), using a more functional approach, which I thought I'd describe. For a first-post I thought i'd start with filtering. (I know, I know, Google-collections / Guava ... hey I like programming for programming's sake ok?).
The basic problem is: you have a List of Objects of some type, and you want to create a new List containing a subset of the original, where some objects are removed based on some properties of those Objects. To make the example concrete lets say we have a list of Strings (List<String>) and we want to remove any String with length less than 3 characters. The obvious way to do it is:
Short and simple, but not particularly pretty, readable or re-usable. Lets not forget that here the predicate or "test" is simple - as the complexity of the predicate grows, so the readability of this implementation declines. A natural next step with a more complex predicate would, of course, be to factor the predicate out into a separate method.
One thing that certainly doesn't feel right is that the predicate is actually expressed as an inverse of the intended behaviour - it basically says "if the string has at least 3 characters, keep it".
Anyway, after filtering a few lists with code similar to this, I decided to factor it out into something that's a little more re-usable, makes it easier to express the intent, and thus makes the code more readable. First, lets look at what the same operation would look like using the utility code, then we'll get to the utility itself:
Now that's a little more wordy, largely because of Java's lack of closure's, but that's a topic for another post :). What I do like about it is that the intent is expressed more clearly - "filter", "remove", aString.length() < 3.
We could make it clearer by writing the Filter implementation as a separate top-level (or nested) class, instead of an anonymous one:
Alternatively we can achieve similar clarity with an anonymous inner class by factoring out the creation of that class into a separate method:
Here the slightly unconventional method name "stringsShorterThan" helps readability in the calling code.
I put the utility code for this into a little class where we were already gathering some other general utility methods, innovatively called "Util". It looks something like this:
Unsurprisingly that's just the code we started with, factored out into a utility method that ever-after lets you provide just the predicate for removal, wrapped in a little boiler plate. If the predicate is complex, or frequently needed, you can factor it out into a top-level class, create a test-case for it, and benefit from re-use.
Subscribe to:
Posts (Atom)